Quick Palak Paneer in less than 10 minutes


SERVES: 4

Why this recipe? How is it green? How am I contributing to making this earth green by following four steps or less recipes?

Using Pressure Cooker will take 8-10 minutes whereas it will take 25-30 minutes in a regular pan. 

You save: 40% of fuel energy and 10 minutes of your precious time that is about 5 to 8% of the total time you spend in kitchen on an average (assuming you spend a total of 2-3 hours in a day in the kitchen)

COOKING TIME: 8-10 Minutes

INGREDIENTS:

1/2 tablespoon oil
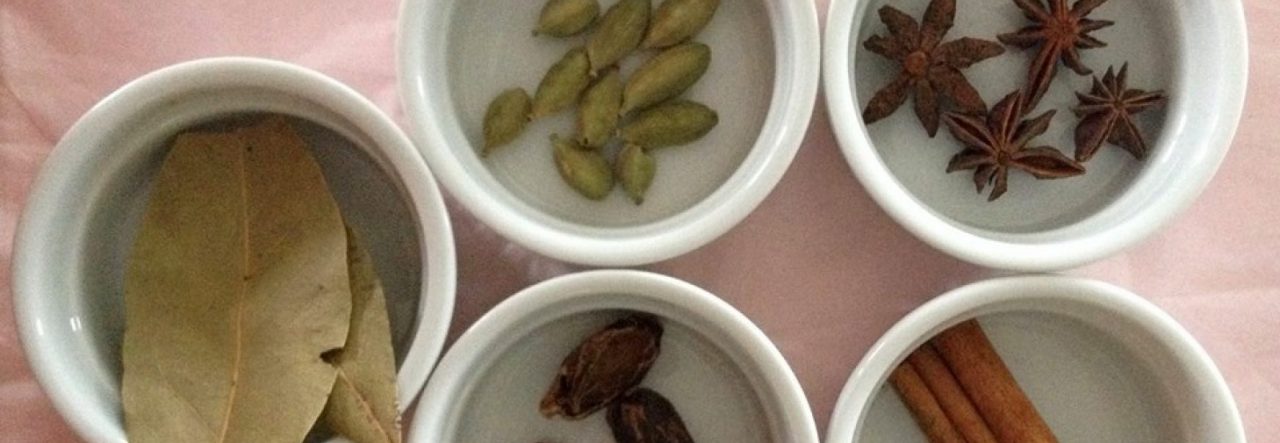
1 cinnamon stick (daal chini)
1 star anise (Chakraphool)
1 brown cardamom (elaichi)
2 bay leaf (tez patta)
½ kilo bag of frozen spinach pellets or
1 kg of fresh spinach leaves
1 large onion – chopped any size
1 large tomato -chopped any size
1 fresh green chilli or 1 inch frozen crushed green chilli
4 cloves of garlic or 2 inch frozen garlic
50 grams freshly grated ginger or 2 inch frozen ginger
1 teaspoon salt
2 teaspoons red chilly powder
2 tablespoons coriander powder
1 teaspoons garam masala (all spice)
1/2 kilo Paneer (cottage cheese)cut to 1 inch pieces
Butter oil for topping (if preferred)

STEP 1. Put all whole spices into heated oil, let them get brown
STEP 2. Add rest of the ingredients and cook for 2 whistles (4-6 minutes) in cooker or in the pan until all tender
STEP 3. Remove whole spices and run the hand grinder for 1-2 minutes right into the cooker/pan to make it smooth. You can then put the whole spices back in if you want to.
STEP 4. Add garam masala and the paneer/tofu pieces and let it simmer for 5 minutes before serving

HANDY TIP:
1. As no oils are needed to prepare the dish, you can add a dollop of butter or butter oil (butter oil) when serving, Spinach is supposed to be dry in nature for body so some healthy grease is advisable.
2. Feel free to replace paneer (cottage cheese) with sautéd Tofu or grilled potatoes.
3. For non vegetarian option replace paneer with boneless chicken tikka.

Advertisement

Quickest Shahi Paneer ever- with a vegan option- No Ghee- No Butter

This is the easiest and a quick recipe for a complicated sounding yet most popular Indian delicacy. People in love with aroma of spices appreciate this preparation the most. Read through handy tips at the end of the recipe to try out vegan and no fat options. 

SERVES: 4

Why this recipe? How is it green? How am I contributing to making this earth green by following four steps or less recipes?

Using Pressure Cooker will take 5-7 minutes whereas it will take 20-25 minutes in a regular pan. 

You save: 40% of fuel energy and 20 minutes of your precious time that may be about 20 to 30% of the total time you spend in kitchen on an average (assuming you spend a total of 1-2 hours in a day in the kitchen)

INGREDIENTS:

1 tablespoons oil
1 cinnamon stick (small)
1 star Anise
1 brown cardamom
5 pieces of cloves
1 teaspoon of tandoori masala
3 medium tomatoes cut very small (preferable pureed)
½ kilo paneer (cottage cheese, feel free to replace it with Tofu, I love it)
1 inch frozen garlic or 2 crushed cloves
2 inch frozen or 25 grams fresh grated ginger
1 teaspoon red chilly powder
1 teaspoon salt
½ teaspoon sugar
20 cashews or almonds (powdered)
200ml full cream milk (I usually make it with low fat milk)

STEP 1. Put all whole spices into heated oil, sauté until brown, should take about a minute or less.
STEP 2. Add small cut tomato/puree, red chilli and sugar and cover pot, let simmer for 3-4 minutes before you add powdered nuts with ¼ glass of water and put pressure cooker lid. Cook for 3-5 minutes in Pressure Cooker until pressure builds up. In an regular pot with lid it will take about 15-20 minutes.
STEP 3. Remove whole spices and run the hand grinder for 1 to 2 minutes right into the pan to make gravy smooth.
STEP 4. Add paneer pieces and half cup of cream/milk to curry as it becomes thick. Let it boil for 5 minutes before you serve.

HANDY TIPS:
1. You can replace cashew nuts/almonds with peanuts or other nuts as per your taste.
2. You may want to garnish it with cut fresh coriander leaves and if you don’t care about making it lean (fat free), feel free to add a tablespoon of fresh cream or butter while serving. For vegan options replace milk with soy milk, coconut milk or almond milk and paneer with Tofu.

Curried Potatoes from Old Delhi- दरीबे के आलू रस


SERVES: 4-5

COOKING TIME: 10-15 Minutes

GLUTEN FREE- LOADED WITH POTASSIUM (more than a banana), VITAMIN C, B6 and IRON

QUICK TO MAKE

Why this recipe? How is it green? How am I contributing to making this earth green by following four steps or less recipes?

Using Pressure Cooker will take 10-12 minutes whereas it will take 20-30 minutes in a regular pan. 

You save: 40% of fuel energy and 15 minutes of your precious time that is about 8 to 10% of the total time you spend in kitchen on an average(assuming you spend a total of 2-3 hours in a day in the kitchen).

INGREDIENTS:

1 teaspoon of oil
1 pinch of asafoetida powder
½ teaspoon Cumin seeds
2 tablespoons crushed fennel seed
4 teaspoons Methi chutney masala, if available or
(1 teaspoon coriander seeds, 2 teaspoon fenugreek seeds and 2 whole red chilli)
2 small tomato chopped
2 teaspoons red chilli powder
4 palm sized potato chopped
2 teaspoons salt
1 tablespoon turmeric powder
1 inch frozen crushed green chilli
1 teaspoon mango powder
1 teaspoon garam masala
Fresh or frozen coriander leaves

STEP 1. Put asafoetida powder, Cumin, fennel seed powder and all other seeds (if not using Methi chutney masala) in heated oil
STEP 2. Sauté for less than a minute, then add tomato and red chilli powder and cover the pan for 3-4 minutes till tomato become soft.
STEP 3. Add potatoes, salt, turmeric powder, frozen crushed green chilli and Methi chutney masala (if available)and enough water to submerge everything plus 2-3 inches, let the cooker give 2 whistles or leave the pressure cooker with whistle on for 10 minutes on fire)
STEP 4. Open cooker lid, add mango powder, garam masala and coriander leaves to garnish before you serve.

thumb_IMG_0280_1024HANDY TIPS:
1. Always wait for the steam in pressure cooker to release by itself. This is a safety precaution as well as retains all flavour of the food.
2. When done, before serving crush a few potatoes in the curry to thicken the density of the curry.


How do I manage excess cooked food? Freeze or not?

Freezing food is a good way to have meals on the go! Whether it be leftovers or extra big batches made for future consumption, it is important to know how to store different foods. Here are some steps to make sure that frozen/refrigerated food is safe to eat and the taste is well preserved for your next meal:

      1. Freeze any fresh cooked food only once it cools down and reaches room temperature. You can quicken the cooling process by placing food in a shallow container on a cooling rack to allow air to circulate all around the container. Limiting the depth of food in containers to 2 inches or less leads to quick cooling.
      2. You can refrigerate practically any recipe of fresh cooked food if you are not going to use it for the next 2-3 days. If you plan to use the cooked food within this time, it is perfectly safe to keep it in fridge, it does not need to take up freezer space!
      3. thumb_IMG_0290_1024Store/freeze excess cooked food in small differently sized containers or freezer bags (not storage bags) so that you only reheat/thaw the amount needed for that meal. thumb_IMG_0105_1024

If using freezer bags try to flattened the food into a thin layer. A lumpy or rounded shape takes longer to thaw through to the middle.
Flat packages are also better for stacking in your freezer.

4. If you had to freeze a large container but want to eat a part of it at a time, be careful when refreezing partly thawed food. The thawed food can be safely refrozen if it still contains ice crystals. Try to reduce the time between thawing and refreezing to ensure that the food to be refrozen does not thaw completely.

Also check- How best to thaw frozen food? and Facts to know with freezing and thawing cooked food.

Tandoori Roti in Toaster

SERVES: 3-4

Quick Light Fresh Baked Bread

COOKING TIME: 5-7 minutes

INGREDIENTS: 
400 grams whole wheat flour
200 ml water
5-10 drops of oil

STEPS:
STEP 1.  Add water to the flour, make dough soft enough that is not sticking to your hands. Take oil on your hand and roll the dough with greased palm to finish. Rest the dough for at least 15-20 minutes before making roti.
STEP 2.  Make balls of dough for the size and thickness that you want the roti to be. Roll the balls to make roti.
STEP 3.  Place rolled roti on to heated non-stick pan, turn it around when you see brown dots on one side.
Step 4.  Once both sides of the roti have been on the heated pan once, move the roti into the toaster on high setting. Fluffed and crisp tandoori roti will pop out of the toaster.

HANDY TIPS:
1. Add water cautiously to the flour not to make dough too soft. Dough should be hard enough to easily roll the ball with a rolling pin. You can add more dry flour to the dough or give the balls a pat of dry flour on either side before and during rolling it.
2.Keep rolling the dough balls into Roti while one is cooking on the pan so that next one is ready as soon as you move the first one into the toaster.
3.Depending on the size of the the slot of your toaster you may want to cut the roti in half before sliding it into the toaster so that all of it bakes well.

Colourful Beet Dip-दही गुलाबो चटनी

Calorie wise nutritious home made spread 
Gluten Free, quick to make 
Packed with Minerals, Vitamins and Antioxidants
Ingredients:
500 grams greek yogurt
One small beet root
1 teaspoon salt
1spring onion chopped small
2 inch frozen crushed green chilli (optional)
2 cloves of crushed garlic fresh or frozen
Preparation:
If you do not use greek yogurt, you will need to extract water from regular yogurt.For this put yogurt in a muslin cloth and hang it for 1-2 hours for the water to drain out.
STEPS:
Step 1. Chop beetroot very small by hand or in a chopper and cook in microwave for 1 minute to make it tender.
Step 2. Add salt, beetroot, spring onion, frozen chopped garlic, and frozen crushed green chilli  to greek yogurt or block of yogurt.
Step 3. Mix everything thoroughly and let it rest for 15-20 minutes before serving.

Handy Tips:IMG_2163

1. Beetroot yogurt dip can be served with baked naan bread, corn wafers,  crackers or thin savoury biscuits.
2. You can be as creative as you want to be , add other herbs like dill weed, rosemary, basil, mint, coriander or spices like red chilli pepper, black pepper.
2. You can also add finely chopped bell peppers, mushrooms or cucumber, going even further you could add bacon pieces.

Plant in a vase-पानी में पौधा

Green looks beautiful indoors, more so if it is in water. Here is a nifty trick to being some greenery inside your home on your kitchen counter or into your family room. A green herb or indoor plant with its roots showing in clear water not only adds vibrance to a room but also has other benefits. Like a mint twig in a room keeps bugs and mosquitoes away. Easily available indoor plants like a creeper, English Ivy, bamboo plant or money plant in water adds beauty and freshness to any room decor.

You need minimal materials for this project. A glass vase, water, a plastic drink cap and a plant. Check out the video above to see how to get through with this quick project.

Handy Tips:

  1. Make sure you do not leave any detergent residue in the glass vase where you want to put this plant as it may result in developing bacteria that may kill the plant.
  2. Do not change water often as all algae that has developed will be lost. Algae helps keep plant healthy.

Cucumber Dill Yogurt Dip-खीरा दही की सदाबहार चटनी

Gluten Free
Loaded with goodness of yogurt and coolness of cucumber
Quick to make  
Ingredients:
500 grams greek yogurt
One medium cucumber grated
1 teaspoon salt
1 tablespoon dry dill weed or fresh chopped dill leaves
2 inch frozen crushed green chilli (optional)
25 grams of cut coriander leaves
2 cloves of crushed garlic fresh or frozen
Preparation:
If you do not use greek yogurt, you will need to extract water from regular yogurt.For this put yogurt in a muslin cloth and hang it for 1-2 hours for the water to drain out.
STEPS:
Step 1. Grate cucumber and add 1/2 teaspoon salt to it, leave it for 5  minutes and then squeeze water out of it.
Step 2. Add salt, grated cucumber, dill, coriander leaves, garlic (fresh or frozen), and frozen crushed green chilli  to greek yogurt or block of yogurt.
Step 3. Mix everything thoroughly. Let it rest for some time or serve immediately.

Handy Tips:IMG_1598

1. This dip goes well as a spread for sandwiches, gyros, shawarma, as a dip with grilled veggies, meats, baked naan bread, corn wafers,  crackers or thin savoury biscuits.
2. You can be as creative as you want to be, add spring onion or other herbs like chives, rosemary, basil, mint, or spices like red chilli pepper, black pepper.

हरी भरी धनिआ मिर्च चटनी- Hot Coriander Chutney

INGREDIENTS:

1 bunch of fresh coriander leaves
10 frozen crushed green chilli chopped
½ small raw green mango chopped fresh or frozen
½ lime squeezed
1 pinch asafoetida powder
2 teaspoons Cumin
2 teaspoons salt
1 teaspoon mango powder

THE ONLY STEP:
Put everything in a food processor and grind it all up together till you get a fine smooth chutney.

HANDY TIP:
If you do not have raw green mango, replace it with handful of dried roasted chickpea, or peanuts or cashews or any other nuts. Raw mango gives the right density and sour flavour to the chutney. The flavour will vary if you replace with another ingredient, you may want to add a little more of mango powder or lemon juice to get cover the sour side of the chutney. Just be creative..IMG_0706

CHICKEN TIKKA-जला भुना मस्त मुर्गा


Grilled/Barbecue/Sautéed

SERVES: 3-4

GLUTEN FREE- LOADED WITH PROTEINS -QUICK TO MAKE

COOKING TIME: 10-15 minutes
INGREDIENTS:

750 grams chicken breast cut into pieces
100g yogurt
4 inch frozen garlic or 8 crushed cloves
4 inch frozen ginger or 50 grams freshly grated
1 teaspoon salt
1 teaspoon red chilli powder
1 tablespoon meat masala powder
1/2 teaspoon orange food colour
For stove cooking: 1 tablespoon of sweet chilli sauce or 1 teaspoon of sugar

STEP 1 .Mix all ingredients and add boneless chicken except sweet chilli sauce and/or sugar (if using stove method). Leave it for 30 minutes, to get best flavours, you can choose to marinate it for lesser time or just cook right away.

STEP 2

  • On the Stove: Put marinated chicken on a heated pan with one tablespoon of oil, cook for 5 minutes on high heat with lid on and then add one tablespoon of any sweet chilli sauce or half a teaspoon of sugar. Cook for about 5 minutes with lid open on high flame. Chicken will be dry, little burnt and crisp with smokey flavour.
  • On the Barbecue: Put chicken pieces on BBQ sticks and put them on high fire for 5 minutes turning in between.
  • In the Oven-To bake place chicken on silver foil (poke holes in foil cause the chicken will let out water) and put in oven for 20 minutes.

thumb_IMG_0157_1024

Serve with one of the delicious and healthy Yogurt dips