This is a quick recipe that requires very few ingredients . It is loaded with vitamin E and is perfect for gluten free and vegan diets. This recipe also does not require any oil or butter as almonds have enough natural grease to make the cupcakes soft and moist. Honey replaces sugar to make it even more healthier.
COOKING TIME- 20-25 minutes
INGREDIENTS:
2 cups blanched almond flour
3 eggs
1 ripe banana
3 tablespoon honey
1 teaspoon baking powder
1/4 teaspoon salt
1 teaspoon vanilla
1 cup berries (whatever you like)
STEPS
1. Mix whisked eggs, honey and mashed banana together with vanilla essence.
2. Add baking powder and salt to the almond flour..
3. Mix the wet and dry ingredients together along with berries.
4. Spoon the mixture into cupcake moulds and bake for 15-20 minutes on 180C in a preheated oven on the middle rack or until brown.
HANDY TIPS:
1. You can choose to put any fresh berries to your liking. I use strawberries, blueberries or raspberries alternatively or together sometimes. You can also use thawed frozen berries by removing their excess water.
2. If you do not find almond flour in the market, grind almonds at home, this will give you unblanched flour which maybe a little darker in colour.
I usually make this karhi when I have varied veggies in small quantities in my fridge that I want to finish off: and also when I have lots of guests to entertain and I need to make something easy and delicious but in large quantities. A variety of vegetables in this recipe adds to the quantity and also makes it more flavourful.
SERVES: 6-8
Why this recipe? How is it green? How am I contributing to making this earth green by following four steps or less recipes?
In an effort to continue to promote use of energy and time saving tools and gadgets, using pressure cooker for this recipe will take about 5 minutes to make the vegetables tender whereas it will take 20-30 minutes in a regular pan. The conventional recipe requires vegetables to be fried to make them tender and then put in the karhi. This alternative will have high trans fat content,
You save: 70% to 80% of fuel energy and 15 to 20 minutes of your precious time that is about 10 to 15% of the total time you spend in the kitchen on an average(assuming you spend a total of 2-3 hours in a day in the kitchen).
COOKING TIME- 20-25 minutes
INGREDIENTS:
2 Tablespoon besan (chickpea flour)
1 Litre water
1 Tablespoon cooking oil
2 Teaspoons fenugreek seeds (Methi seeds)
2 Teaspoons cumin seeds (Jeera)
4 Whole dried red chillies (i like using rounds more than the long ones)
1 Tablespoon turmeric powder (Haldi)
1/2 Tablespoon red chilli powder
50 gms of tamarind pulp (without seeds) after soaking in water
1 Kilo assorted vegetables cut into 2 inch dices (I use all veggies that are available in my fridge like Okra (bhindi), egg plant, zucchini, beans, any kind of guard, cauliflower, lotus stem, potatoes, broccoli, carrots).
Salt to taste ( approximately 4 teaspoons)
STEPS
1. Heat oil in the pressure cooker, add fenugreek seeds, cumin seeds and whole red chillies, once flavour is released, add chickpea flour and sauté it for 2-3 minutes
2. Add water, cut vegetables, turmeric powder, red chilli powder and salt. Close the lid of the pressure cooker and let it get one whistle or 5 minutes until pressure is built in the cooker. (just enough to get the vegetables tender, this is to save time)
3. Open the lid after the pressure is released, add tamarind pulp and let the karhi boil for 10-12 minutes .. And it is ready…
HANDY TIPS:
1. Keep the karhi on low heat even when it is being served.. The more it boils, more flavours are released of different vegetables, it continues to get more delicious.
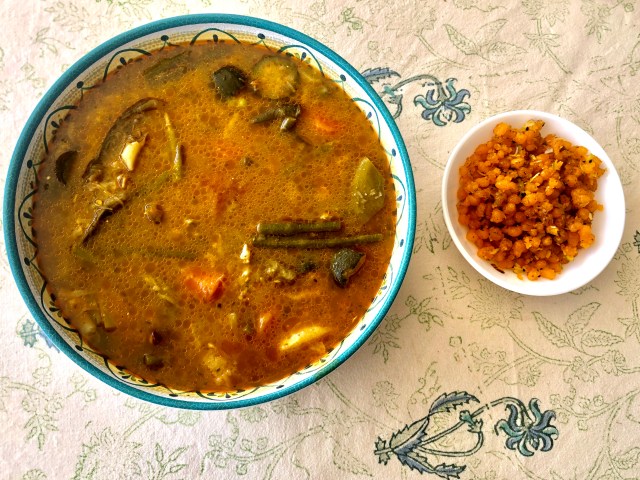
2. Sindhi Karhi typically is served first as a stew or soup, and in the main meal with rice and sweet boondi (chickpea flour droplets fried and then dipped in sugar syrup, see picture above)
Why this recipe? How is it green? How am I contributing to making this earth green by following four steps or less recipes?
Easy to make, gluten free and sugar free classic indian dessert made in less than half the time of usual conventional recipe. Saving time and energy thereby reducing the carbon footprint on our precious planet.
SERVES- 6
COOKING TIME- 30-45 minutes
INGREDIENTS:
1 kilogram carrots grated
1 litre fresh Milk (full cream optional)
½ tablespoon Ghee
2 green cardamoms
10-15 pitted dates(about 100 grams) cut in small pieces
15-20 almonds cut in slices (about 25 grams) (optional)
15-20 cashews halves (about 25 grans) (optional)
20-25 raisins (about 25 grams) (optional)
10 strands of saffron beaten on a cutting board or pastel (optional)
STEPS
1. Put ghee in the pan and add cardamoms after cracking them open so that the flavour is released.
2. After a minute or so add grated carrots and sauté them for 3-5 minutes until the colour changes to little dark (excess moisture will evaporate during this process).
3. Add milk and place the heat on low after the milk starts to boil. Let it simmer for 20-25 minutes. Keep stirring at intervals of 3-4 minutes. You will notice carrots cooking, absorbing milk, becoming more tender and getting cooked in milk.
4. Add cut dates , saffron and nuts and let it cook for another 10-12 minutes until all milk is absorbed and the milk dries out.. surface f the pan will greasy now without traces of water/milk…and it is ready to serve..
HANDY TIPS:
1. If you leave the heat on low all through the process you don’t need to stir as often.
2. I usually use low fat milk, you could use full cream milk to make it more creamy and rich.
INGREDIENTS
2 eggs
100 grams Mascarpone cheese
50 ml brewed coffee
25 ml Irish cream liqueur (optional)
50 grams sugar powder
20-25 lady finger Italian biscuits (or left over bread or cake)
50 grams whipped cream(optional)
1 teaspoon vanilla essence
1 tablespoon of cocoa powder
1 teaspoon of cinnamon powder
PREPERATION
-Brew coffee and put it in the fridge to cool down
-Keep Mascarpone cheese outside the fridge to bring it to room temperature
-Separate egg yolks from whites and keep whites in the fridge until you need them in the recipe
STEPS
STEP 1. Mix egg yolks and sugar and put it on a double boiler pan. Keep stirring it until it gets a little thick and sugar looks cooked (about 4-5 minutes). Put this in fridge to cool down. You will start making Tiramisu once this is cooled down.
STEP 2. Beat egg whites with electric beater to a point where whites are drip free and form soft peaks. Similarly, beat whipped cream to a point where is becomes thick and soft NOT to make butter, stop just before that.
STEP 3. Fold in egg yolks mixture, egg whites mix, cheese and whipped cream softly.
Step 4. Mix coffee and Irish cream liqueur in a shallow dish, dip the biscuits in a quick motion into this mixture (do not dip them in the liquid too long as the biscuits are very light and may melt away) and layer them in the serving dish. Spread the cream mixture as per step 3 over the dipped layered biscuits, place another layer of coffee dipped biscuits and then another layer of the cream mixture. Sprinkle cocoa powder and cinnamon powder over this using a small sieve.
HANDY TIPS:
1. As a substitute to Italian lady finger biscuits you could use left over bread or cake and dip it well in the coffee and liquor mixture before spreading the eggs and cream mixture. It comes out quite close to the original taste.
2. You can avoid putting whipped cream if you are counting on calories. I have skipped it quite a few times and it has come out well.
3. I also use reduced amount of sugar and cheese at times.
4. You could also sprinkle nutmeg powder as per you taste buds.
5. Irish cream liquor can be substituted with any other liqueur like Amarula, Baileys or other cocoa /coffee based liqueurs.
Quick to make, great to store, healthy option for munching time.
I cup of sliced Arrowroot (120 grams) is only 78 calories. With this baked chips option you will have a healthy snack loaded with folate and B12. It is low calorie and is easy to digest. These crisp chips taste as good as potato chips, even better.
INGREDIENTS
1 small arrowroot bulb about 80-100 grams
1 tablespoon olive oil
1 teaspoon salt
1 teaspoon seasoning
PREPRATION
Preheat oven to 200 C degrees
STEPS
STEP 1. Slice arrowroot to make chips. Pat them with a clean cloth or paper napkin to remove moisture.
STEP 2. Put all ingredients together in a bowl and mix well
STEP 3. Spread evenly, the oil and salt smeared chips on a baking tray on parchment paper
STEP 4. Bake the chips for 8-10 minutes in top rack and then turn them around and bake for another 5-10 minutes.
Serve with one of the delicious and healthy Yogurt dips
HANDY TIPS:
1. You can make Zucchini, cassava or sweet potato baked chips the same way, adding a bit of minced garlic or ginger will give the chip a different and a nice flavour.
2. For more crispy gluten free options try adding some oats flour, rice flour, or consider adding an egg white when preparing the chips for baking.
Why this recipe? How is it green? How am I contributing to making this earth green by following four steps or less recipes?
Using Pressure Cooker for this recipe will take 10-15 minutes for the meat to cook whereas it will take 30-45 minutes in a regular pan.
This recipe saves you : more than 70% of fuel energy and 30 minutes of your precious time that is about 16 to 20% of the total time you spend in kitchen on an average (assuming you spend a total of 2-3 hours in a day in the kitchen)
Allows you to explore your creative side. For vegetarian options, substitute lamb with baby potatoes, baby pumpkins, cottage cheese or other veggies.
TOTAL COOKING TIME: 25-30 Minutes
INGREDIENTS:
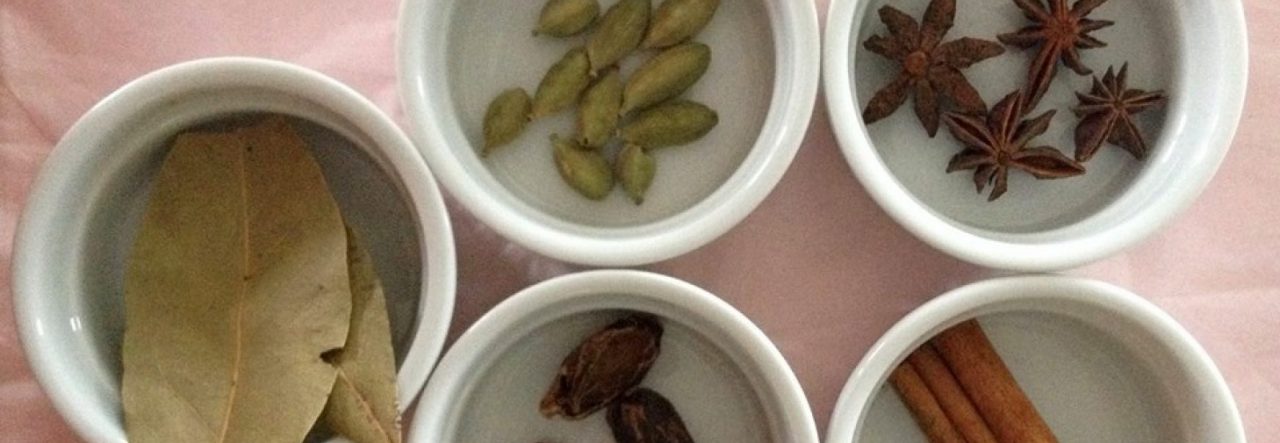
1 tablespoon oil
1 daal chini (cinnamon stick)
1 chakraphool (star anise)
1 brown elaichi (cardamom)
2 green elaichi (cardamom)
50 grams of khus khus (poppy seeds)
2 tez patta (bay leaf)
6 palm sized pureed or finely chopped onion
2 medium sized pureed tomatoes
1 inch frozen ginger
2 inch frozen garlic
2 teaspoons meat masala/ curry powder
1 kilo lamb shoulder cut to small pieces
1 teaspoon red chilli (if you like it hot)
1 inch frozen green chilli or 2 fresh green chilies
1 teaspoon garam masala (All spice)
2 teaspoons salt
STEP 1. Put daal chini (cinnamon), chakraphool (star anise), elaichi (cardamoms) and tez patta (bay leaf) in heated oil, after 30 seconds to a minute add pre sautéed onion and poppy seeds or if using freshly chopped onion, sauté until onion are light brown. STEP 2. Add lamb and meat masala , Stir for 2-3 minutes, add frozen ginger, frozen garlic, green chilli, salt and red chilli powder . STEP 3. Sauté for 5-7 minutes and then add pureed tomato, and stir it well, add half a glass of water before you close the lid of the pressure cooker. STEP 4. Cook on low heat for 10-12 minutes (or for three whistles) in pressure cooker or for 30-45 minutes in pan with lid on and add garam masala before serving.
HANDY TIPS:
You can replace lamb with pork, chicken, beef and baby potatoes or vegetables for vegetarian option.
Always wait for the steam in pressure cooker to release by itself. This is a safety precaution as well as retains all flavour of the food.
Add a few drops of Kewra essence (a floral essence) to get that unique rich muglai flavour.
A similar conventional recipe for a home made flour based pizza base would take considerable time for yeast to work its way. Nutritional benefits of cauliflower and goodness of eggs adds to the dietary value of the pizza base.
Vegan Option (no eggs, no dairy, no sugar)
For the vegan option replace eggs with chia/flax seeds and almond meal mixed with water. (see recipe below)
How is it green?How am I contributing to making this earth green by following four steps or less recipes?
This recipe requires minimum cooking time, you save fuel energy and your precious time. You can also make 2-3 pizza bases with the same oven baking time and save them for future use.
SERVES- 2-3
COOKING TIME
15 minutes for no flour pizza base
20-30 minutes for vegan pizza base
8-10 minutes for pizza toppings
Flour free Pizza (with eggs)
INGREDIENTS:
1 medium sized cauliflower (400 grams)
2 eggs
1 teaspoon salt (optional)
1/2 teaspoon Red chilli flakes (optional)
1 table spoon dill weed or oregano(optional)
Pizza toppings and cheese to taste
STEPS:
1. Chop/grind cauliflower and squeeze all water out of it.
2. Beat eggs and add all ingredients to it (squeezed cauliflower, salt, chilli flakes and oregano).
3. Spread/pat down the mixture on parchment paper and bake for 10 minutes at 400F or until the base turns lightly brown. It usually take 10 minutes.
4. Add toppings and cheese to the pizza to your taste and bake for another 5-10 minutes.
For Vegan Option:
INGREDIENTS:
1 medium sized cauliflower (400 grams)
3 tablespoons of ground chia or flax seeds
1/2 cup of almond meal
3 to 6 tablespoons of water
1 teaspoon salt (optional)
1/2 teaspoon Red chilli flakes (optional)
1 table spoon dill weed or oregano (optional)
1 teaspoon olive oil
Pizza toppings to taste
Preparation For Vegan pizza base:
Mix ground chia or flax seeds with 3 tablespoons of water and leave for 10 minutes for the mixture to look like thick vegan egg
STEPS:
1. Chop/grind cauliflower and squeeze all water out of it.
2. Add all other ingredients squeezed cauliflower that is chia mix, almond meal, salt, chilli flakes and oregano). You may need to add more water for the mixture to be able to spread like dough, but add as little to make the crust crispy.
3. Spread by patting the mixture on parchment paper and bake for 20 minutes at 400F or until the base is lightly brown.
4. Add toppings to the pizza to your taste and bake for another 5-10 minutes.
Serve with one of the delicious and healthy Yogurt dips
HANDY TIPS:
1. Spread or spray some olive oil on the pizza just before putting it in the oven. This will make it more crisp and yummy.
2. You can make more than one pizza base as per your choice of thickness of the base and save them when they cool down. Wrap the base in a cling wrap and freeze for future use.
A similar conventional fried fish recipe would take considerable oil and time to deep fry the fish. Nutritional benefits of chickpea flour and goodness of veggies in the oats as a side, add to the dietary value and palate.
How is it green?How am I contributing to making this earth green by following four steps or less recipes?
This recipe needs only 10 minutes of cooking time, you save fuel energy and your precious time.
For Main Recipe
400 grams fish (or Zucchini/Eggplant for vegetarian option)
1 teaspoon of oil
50 grams frozen or fresh ginger
50 grams of fresh or frozen crushed garlic
cut coriander leaves
2 chopped fresh or frozen green chillies
2 pinches of orange food colour
1 tea spoon of salt
100 grams of chickpea flour
For SIDE
200 grams of rolled oats
2 teaspoon of oil
1/2 cup frozen green or fresh peas
1/2 cup of frozen sweet corn
3-4 nuggets of frozen spinach
10-15 craisins
10-15 pieces of pecans
3/4 glass of water
STEPS -Main recipe: STEP 1. Mix all ingredients except oil and chickpea flour and marinade fish or Zucchini/eggplant pieces with it, leave it for 10 minutes. STEP 2. Add chickpea flour and oil and smear all pieces well with the flour. before putting them on a non-stick heated pan. Leave it with lid covered on high flame for 2-3 minutes and turn it over once before it is ready (will be a total of 5-6 minutes). STEP 3. Put all pieces on a non-stick heated pan. Leave it with lid covered on high flame for 2-3 minutes and turn it over once before it is ready (will be a total of 5-6 minutes).
STEPS for side : STEP 1. In another pan sauté rolled oats in heated oil for 3 to 4 minutes. STEP 2.Add all ingredients including water. Let it simmer with lid closed for 3-5 minutes. STEP 3. Serve fish with oats. You can add all spice to oats before serving.
Serve with one of the delicious and healthy Yogurt dips
HANDY TIPS:
1. Cooking on high flame with lid covered will leave the fish/zucchini/eggplant juicy and tender while the chickpea flour will make it crisp from outside.
2. Be creative and replace fish/zucchini/eggplant and or marination herbs with your choice of flavour/aroma.
Cut Chicken breast into thin layers and make long stripes
STEPS
STEP 1. Mix ginger, garlic, salt and all spice and make a paste.
STEP 2. Place chicken stripes on a cutting board and rub the garlic ginger paste,. Now you need to place rest of the ingredients to cover the surface of each stripe and roll the chicken stripe. (Suggestion- start with placing spinach leaves, then grated cheese, one half of pecan/walnut and then one half of dried apricot/date on top end of the stripe).
STEP 3. Stick in a bamboo pick/toothpick making sure you take the nut/date into the pick and place all chicken picks on a baking tray or on the grill on barbecue.
STEP 4. Bake for 5 minutes at 400 degrees C and broil for 2 minutes at 550 degrees to give it the golden colour. If using barbecue, grill on high heat for 5-10 minutes.
Serve it with one of the delicious and healthy Yogurt dips
HANDY TIPS:
1. This can be cooked in microwave also with convection option.
2.Put a dollop of yogurt dip to give it a moist feel.
3. Always cook chicken breast on high heat as it cooks very fast and short time of cooking retains all its juices.
4. Be creative and replace spinach with basil or other herbs of your choice or roll a bacon strip outside to give a dramatic look.
Why this recipe? How is it green? How am I contributing to making this earth green by following four steps or less recipes?
A similar conventional recipe takes 3-4 hours in oven or grill. Using Pressure Cooker will take 20-25 minutes on stove and 15 minutes of oven time. Meat comes out as tender as a marshmallow and falling off the bone.
You save: 90% of fuel energy and 3 hours of your precious time that you can spend doing something more productive with your loved ones.
For Tenderizing and Marination
25 ml lemon or lime juice (one lime or lemon)
1 teaspoon salt
½ kilo Pork ribs/riblets
100 grams yogurt
50 gms frozen or fresh crushed ginger
50 gms frozen or fresh crushed garlic
2-3 finely chopped green chillies
1 tablespoon all spice
For Basting
50 ml barbecue sauce
20 ml thai sweet chilli sauce
20 ml Teriyaki sauce
1 teaspoon oil
For Cooking Ribs
1 teaspoon oil
8-10 black pepper corns
2 bay leaves
For Side
½ kilo baby potatoes
PREPARATION:
Put lemon juice and salt on ribs to tenderize for 10 minutes
Add all marination ingredients to yogurt and smear it on ribs to marinate it for 10-15 minutes
COOKING STEPS:
STEP 1. Put black pepper corns and bay leaves in heated oil in pressure pan, and place marinated ribs to cook on slow heat for 20-25 minutes..
STEP 2. Open cooker lid when all steam is released and place ribs on a foil tray to be put in the oven preheated to 550F maximum heat (Broil option)
STEP 3. Mix all Basting sauces and baste ribs with it before putting it in the oven for 5 minutes. Repeat basting every 5 minutes for 2-3 times
STEP 4. When ribs are baking in the oven, put baby potatoes along with all ribs broth/juices from the pressure pan under the ribs tray. Both ribs and potatoes will be ready at the same time.
Serve with one of the delicious and healthy Yogurt dips
HANDY TIPS:
1. Always wait for the steam in pressure cooker to release by itself. This is a safety precaution as well as retains all flavour of the food.
2. You may want to put baby potatoes in the ribs broth/juices from the pressure pan at the time of preheating the oven, this will give additional time for potatoes to cook. This will maximize the use the oven heat.


 INGREDIENTS


 STEPS:
 STEPS for side :
