Featured

Why use spices?

Spices offer exotic flavours to food, and flavourful food is divine. But spices are not just used to appease our taste.In fact, some spices can be a real boost to the body, and help rid it of toxins. Here are some benefits of spices used in most of my recipes:

1. Turmeric (haldi): Curcumin is the main active ingredient in turmeric. It has powerful anti-inflammatory effects and is a very strong antioxidant. Arthritis, joint pains, and Alzheimer are some of the known medical problems that turmeric helps in curing. It has been used in India for ages for cosmetic benefits like bringing radiance to skin, curing acne and skin related medical problems.
2. Cloves (laung): Anti-viral, Anti-fungal, anti-inflammatory, antioxidant, aphrodisiac, source of many minerals, and Omega-3 fatty acids
3. Cumin seeds (jeera): helps remove toxins, helps with digestion, lactation, common cold, diabetes, insomnia, prevents memory loss.
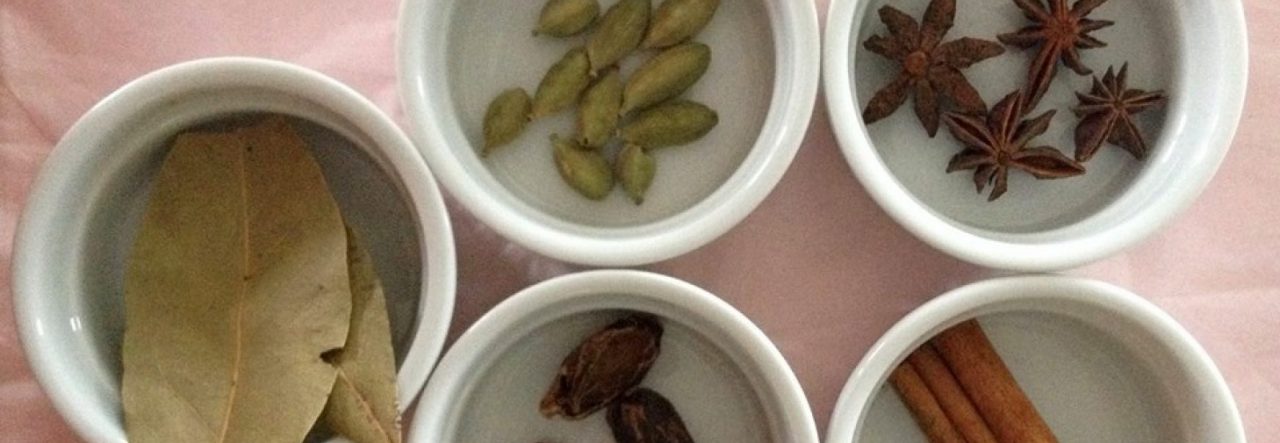
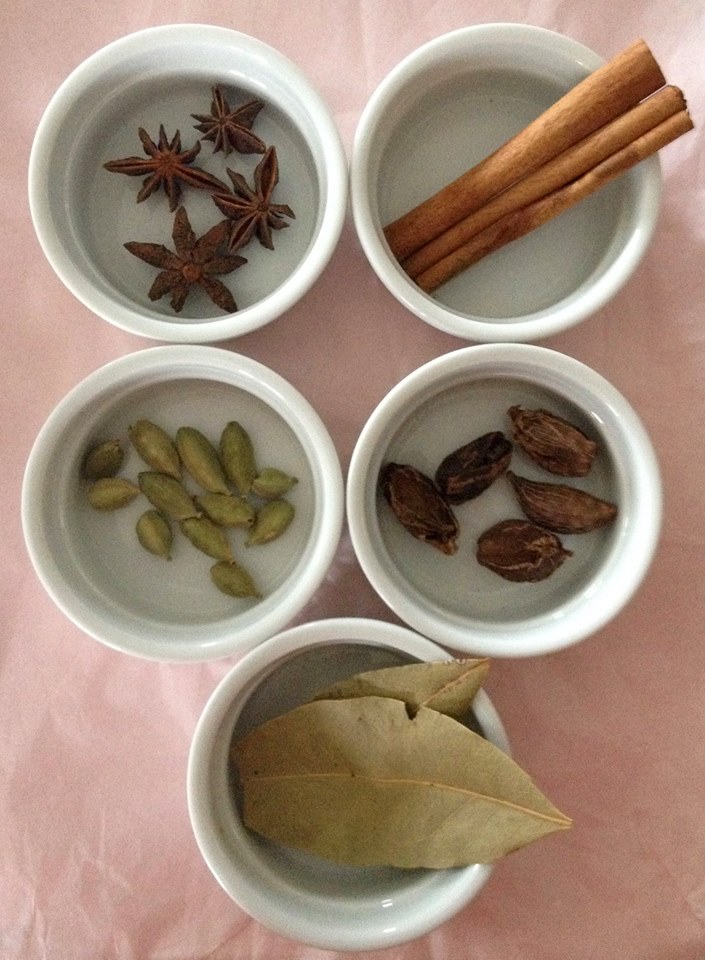
4. Bay leaf (tez patta): boosts immunity, improves nervous system function, protects oral health, regulates body metabolism and prevents blood-related conditions like anemia.
5. Star Anise (chakraphool): antioxidant, rich in vitamins and minerals like iron, potassium, copper, and manganese. Has stomachic, anti-spasmodic, antiseptic, digestive, expectorant, and stimulant properties. Helps to increase the circulation and oxygenation of body parts.
6. Caraway Seeds (ajwain): improve digestion, reduce constipation, lowers blood cholesterol, reduces bloating, belching, gas and gas pains and improves blood pressure. A source for thiamine, pyridoxine, riboflavin, and niacin, iron, copper, calcium, potassium, manganese, selenium, zinc and magnesium. This is most commonly used as a safe treatment in India for stomach related medical problems for infants and kids.
7. Cardamom (elaichi): Aids in digestion and increased frequency and volume of urination, reduces spasms, lowers blood pressure and increases metabolism. A source of vitamins and minerals like riboflavin, niacin, vitamin C, iron, manganese and potassium.
8. Cinnamon (dal chini): Reduces inflammation, eliminates pain and infections, manages diabetes, reduces bloating, belching, gas and gas pains , increases cognitive function, good for bones, prevents cancer and good for the health of eyes and skin.

These are all mild flavoured spices used commonly in an Indian household. All of these are easily available in asian grocery stores all over the world. It is also good to know that they are quite inexpensive.

Spices should be used according to personal preferences/palates and in moderate quantities.

Advertisement

Quick Palak Paneer in less than 10 minutes


SERVES: 4

Why this recipe? How is it green? How am I contributing to making this earth green by following four steps or less recipes?

Using Pressure Cooker will take 8-10 minutes whereas it will take 25-30 minutes in a regular pan. 

You save: 40% of fuel energy and 10 minutes of your precious time that is about 5 to 8% of the total time you spend in kitchen on an average (assuming you spend a total of 2-3 hours in a day in the kitchen)

COOKING TIME: 8-10 Minutes

INGREDIENTS:

1/2 tablespoon oil
1 cinnamon stick (daal chini)
1 star anise (Chakraphool)
1 brown cardamom (elaichi)
2 bay leaf (tez patta)
½ kilo bag of frozen spinach pellets or
1 kg of fresh spinach leaves
1 large onion – chopped any size
1 large tomato -chopped any size
1 fresh green chilli or 1 inch frozen crushed green chilli
4 cloves of garlic or 2 inch frozen garlic
50 grams freshly grated ginger or 2 inch frozen ginger
1 teaspoon salt
2 teaspoons red chilly powder
2 tablespoons coriander powder
1 teaspoons garam masala (all spice)
1/2 kilo Paneer (cottage cheese)cut to 1 inch pieces
Butter oil for topping (if preferred)

STEP 1. Put all whole spices into heated oil, let them get brown
STEP 2. Add rest of the ingredients and cook for 2 whistles (4-6 minutes) in cooker or in the pan until all tender
STEP 3. Remove whole spices and run the hand grinder for 1-2 minutes right into the cooker/pan to make it smooth. You can then put the whole spices back in if you want to.
STEP 4. Add garam masala and the paneer/tofu pieces and let it simmer for 5 minutes before serving

HANDY TIP:
1. As no oils are needed to prepare the dish, you can add a dollop of butter or butter oil (butter oil) when serving, Spinach is supposed to be dry in nature for body so some healthy grease is advisable.
2. Feel free to replace paneer (cottage cheese) with sautéd Tofu or grilled potatoes.
3. For non vegetarian option replace paneer with boneless chicken tikka.

Quickest Shahi Paneer ever- with a vegan option- No Ghee- No Butter

This is the easiest and a quick recipe for a complicated sounding yet most popular Indian delicacy. People in love with aroma of spices appreciate this preparation the most. Read through handy tips at the end of the recipe to try out vegan and no fat options. 

SERVES: 4

Why this recipe? How is it green? How am I contributing to making this earth green by following four steps or less recipes?

Using Pressure Cooker will take 5-7 minutes whereas it will take 20-25 minutes in a regular pan. 

You save: 40% of fuel energy and 20 minutes of your precious time that may be about 20 to 30% of the total time you spend in kitchen on an average (assuming you spend a total of 1-2 hours in a day in the kitchen)

INGREDIENTS:

1 tablespoons oil
1 cinnamon stick (small)
1 star Anise
1 brown cardamom
5 pieces of cloves
1 teaspoon of tandoori masala
3 medium tomatoes cut very small (preferable pureed)
½ kilo paneer (cottage cheese, feel free to replace it with Tofu, I love it)
1 inch frozen garlic or 2 crushed cloves
2 inch frozen or 25 grams fresh grated ginger
1 teaspoon red chilly powder
1 teaspoon salt
½ teaspoon sugar
20 cashews or almonds (powdered)
200ml full cream milk (I usually make it with low fat milk)

STEP 1. Put all whole spices into heated oil, sauté until brown, should take about a minute or less.
STEP 2. Add small cut tomato/puree, red chilli and sugar and cover pot, let simmer for 3-4 minutes before you add powdered nuts with ¼ glass of water and put pressure cooker lid. Cook for 3-5 minutes in Pressure Cooker until pressure builds up. In an regular pot with lid it will take about 15-20 minutes.
STEP 3. Remove whole spices and run the hand grinder for 1 to 2 minutes right into the pan to make gravy smooth.
STEP 4. Add paneer pieces and half cup of cream/milk to curry as it becomes thick. Let it boil for 5 minutes before you serve.

HANDY TIPS:
1. You can replace cashew nuts/almonds with peanuts or other nuts as per your taste.
2. You may want to garnish it with cut fresh coriander leaves and if you don’t care about making it lean (fat free), feel free to add a tablespoon of fresh cream or butter while serving. For vegan options replace milk with soy milk, coconut milk or almond milk and paneer with Tofu.

Curried Potatoes from Old Delhi- दरीबे के आलू रस


SERVES: 4-5

COOKING TIME: 10-15 Minutes

GLUTEN FREE- LOADED WITH POTASSIUM (more than a banana), VITAMIN C, B6 and IRON

QUICK TO MAKE

Why this recipe? How is it green? How am I contributing to making this earth green by following four steps or less recipes?

Using Pressure Cooker will take 10-12 minutes whereas it will take 20-30 minutes in a regular pan. 

You save: 40% of fuel energy and 15 minutes of your precious time that is about 8 to 10% of the total time you spend in kitchen on an average(assuming you spend a total of 2-3 hours in a day in the kitchen).

INGREDIENTS:

1 teaspoon of oil
1 pinch of asafoetida powder
½ teaspoon Cumin seeds
2 tablespoons crushed fennel seed
4 teaspoons Methi chutney masala, if available or
(1 teaspoon coriander seeds, 2 teaspoon fenugreek seeds and 2 whole red chilli)
2 small tomato chopped
2 teaspoons red chilli powder
4 palm sized potato chopped
2 teaspoons salt
1 tablespoon turmeric powder
1 inch frozen crushed green chilli
1 teaspoon mango powder
1 teaspoon garam masala
Fresh or frozen coriander leaves

STEP 1. Put asafoetida powder, Cumin, fennel seed powder and all other seeds (if not using Methi chutney masala) in heated oil
STEP 2. Sauté for less than a minute, then add tomato and red chilli powder and cover the pan for 3-4 minutes till tomato become soft.
STEP 3. Add potatoes, salt, turmeric powder, frozen crushed green chilli and Methi chutney masala (if available)and enough water to submerge everything plus 2-3 inches, let the cooker give 2 whistles or leave the pressure cooker with whistle on for 10 minutes on fire)
STEP 4. Open cooker lid, add mango powder, garam masala and coriander leaves to garnish before you serve.

thumb_IMG_0280_1024HANDY TIPS:
1. Always wait for the steam in pressure cooker to release by itself. This is a safety precaution as well as retains all flavour of the food.
2. When done, before serving crush a few potatoes in the curry to thicken the density of the curry.


Invigorating Lamb-नशीली गोश्त करी

SERVES: 4

Why this recipe? How is it green? How am I contributing to making this earth green by following four steps or less recipes?

Using Pressure Cooker for this recipe will take 10-15 minutes for the meat to cook whereas it will take 30-45 minutes in a regular pan. 

This recipe saves you : more than 70% of fuel energy and 30 minutes of your precious time that is about 16 to 20% of the total time you spend in kitchen on an average (assuming you spend a total of 2-3 hours in a day in the kitchen)

Allows you to explore your creative side. For vegetarian options, substitute lamb with baby potatoes, baby pumpkins, cottage cheese or other veggies.

TOTAL COOKING TIME: 25-30 Minutes

INGREDIENTS:

1 tablespoon oil
1 daal chini (cinnamon stick)
1 chakraphool (star anise)
1 brown elaichi (cardamom)
2 green elaichi (cardamom)
50 grams of khus khus (poppy seeds)
2 tez patta (bay leaf)
6 palm sized pureed or finely chopped onion
2 medium sized pureed tomatoes
1 inch frozen ginger
2 inch frozen garlic
2 teaspoons meat masala/ curry powder
1 kilo lamb shoulder cut to small pieces
1 teaspoon red chilli (if you like it hot)
1 inch frozen green chilli or 2 fresh green chilies
1 teaspoon garam masala (All spice)
2 teaspoons salt

STEP 1. Put daal chini (cinnamon), chakraphool (star anise), elaichi (cardamoms) and tez patta (bay leaf) in heated oil, after 30 seconds to a minute add pre sautéed onion and poppy seeds or if using freshly chopped onion, sauté until onion are light brown.
STEP 2. Add lamb and meat masala , Stir for 2-3 minutes, add frozen ginger, frozen garlic, green chilli, salt and red chilli powder .
STEP 3. Sauté for 5-7 minutes and then add pureed tomato, and stir it well, add half a glass of water before you close the lid of the pressure cooker.
STEP 4. Cook on low heat for 10-12 minutes (or for three whistles) in pressure cooker or for 30-45 minutes in pan with lid on and add garam masala before serving.

HANDY TIPS:lambcurry

  1. You can replace lamb with pork, chicken, beef and baby potatoes or vegetables for vegetarian option.
  2.  Always wait for the steam in pressure cooker to release by itself. This is a safety precaution as well as retains all flavour of the food.
  3. Add a few drops of Kewra essence (a floral essence) to get that unique rich muglai flavour.

Chickpea Fish/Eggplant with Oats -अमृतसरी मच्छी या बैगुन और ज्वार का पोहा


GLUTEN FREE

QUICK TO MAKE

Why this recipe? 

A similar conventional fried fish recipe would take considerable oil and time to deep fry the fish. Nutritional benefits of chickpea flour and goodness of veggies in the oats as a side, add to the dietary value and palate. 

How is it green? How am I contributing to making this earth green by following four steps or less recipes?

This recipe needs only 10 minutes of cooking time, you save fuel energy and your precious time.

SERVES: 3-4
COOKING TIME: 8-10 Minutes
PREPARATION: 10 minutes (Marination)

INGREDIENTS:

For Main Recipe
400 grams fish (or Zucchini/Eggplant for vegetarian option)
1 teaspoon of oil
50 grams frozen or fresh ginger
50 grams of fresh or frozen crushed garlic
cut coriander leaves
2 chopped fresh or frozen green chillies
2 pinches of orange food colour
1 tea spoon of salt
100 grams of chickpea flour

For SIDE
200 grams of rolled oats
2 teaspoon of oil
1/2 cup frozen green or fresh peas
1/2 cup of frozen sweet corn
3-4 nuggets of frozen spinach
10-15 craisins
10-15 pieces of pecans
3/4 glass of water

STEPS -Main recipe:
STEP 1. Mix all ingredients except oil and chickpea flour and marinade fish or Zucchini/eggplant pieces with it, leave it for 10 minutes.
STEP 2. Add chickpea flour and oil and smear all pieces well with the flour. before putting them on a non-stick heated pan. Leave it with lid covered on high flame for 2-3 minutes and turn it over once before it is ready (will be a total of 5-6 minutes).
STEP 3. Put all pieces on a non-stick heated pan. Leave it with lid covered on high flame for 2-3 minutes and turn it over once before it is ready (will be a total of 5-6 minutes).

IMG_1154STEPS for side :
STEP 1.
In another pan sauté rolled oats in heated oil for 3 to 4 minutes.
STEP 2. 
Add all ingredients including water. Let it simmer with lid closed for 3-5 minutes.
STEP 3.  
Serve fish with oats.  You can add all spice to oats before serving.

Serve with one of the delicious and healthy Yogurt dips

HANDY TIPS:
1. Cooking on high flame with lid covered will leave the fish/zucchini/eggplant juicy and tender while the chickpea flour will make it crisp from outside.
2. Be creative and replace fish/zucchini/eggplant and or marination herbs with your choice of flavour/aroma.

Is your freezer empty? Save energy- fill it up!

Did the title surprise you? I am sure it did, but it is a fact that it is more economical and energy efficient to have a full freezer. Getting rid of empty space ensures that the cold air doesn’t need to circulate as much, so less power is needed and consumed!

Consider filling up all this free space with anything you can freeze. Everyday items such as frozen herbs/vegetables or breads are good options, as well as course chopped garlic, ginger and green chillies. If you do not have much to freeze though, you can also fill plastic bottles half full of water and use them to fill gaps.

It may sounds crazy, but a third option is to fill the freezer with your unwashed jeans! They would need to be properly wrapped in plastic covering, with all the air released from the plastic bag. This is actually the latest method of washing jeans that Levi’s CEO Chip Bergh advises. Freeze your jeans to kill the germs that make them smelly! People are getting on board with this whacky technique, and you can too!

Whether it’s everyday food items, space fillers or unwashed jeans, get that freezer filled up and save on energy!


How best to thaw frozen food?

  1. baby pumpkinPlan ahead! Smaller items can thaw overnight in the refrigerator, however foods weighing 1 kilo or more will  take about 24 hours in the fridge to thaw.
  2. It is best to thaw the freezer bags on a plate or a pan so that moisture does not drip.
  3. Food may be transferred from a freezer bag to a microwave safe container for thawing in the microwave.
  4. Food thawed in the microwave tends to quickly reach temperatures that boost bacterial growth, so plan to cook or reheat it right away.

Also check- How do I manage excess cooked food? Freeze or not? and Facts to know with freezing and thawing

Why do I still not use a pressure cooker?

It might be because you have heard a horror story about old-fashioned pressure cookers. Trust me pressure cookers today are very different from those outdated aluminum models, and are perfectly safe to use as long as instructions are followed.

I am on a mission to make people around me to think differently about this kitchen equipment that can save both time and money. I know all of us understand the need and importance of green cooking, smart energy saving and cutting our carbon footprint on this beloved planet.

Consider the fact that pressure cooking saves 70% or more energy than conventional methods of cooking. YOU can make a positive difference to the environment and also save considerable cooking time by switching to this method. So, take this small step to help save earth. Watch how easy it is to use one.

I have seen people scared to death with the idea of using a pressure cooker. Often it is the fear of high pressures and accidentally blowing a hole through the kitchen ceiling. For others it may be the sound, which can seem similar to a jet taking off. Or then it might be the geysers of steam shooting out of this contraption that make people uncomfortable .

Despite these seemingly frightening aspects of the pressure cooker, it is an easy to use and effective piece of equipment, and with the right instruction you can definitely get over your “exploding disaster” fears!

Facts about Pressure Cookers:

  1. Modern pressure cookers are all about the safety features, which include a top that locks on securely, a pressure indicator, and a safety pressure release valve.
  2. In terms of steam heat, it is hot, but quickly cools.  It is not as dangerous as cooking something with grease.
  3. Ways of releasing the pressure
    1. Quick release
    2. Running water
    3. Natural release

To get over the fear.

  1. Choose the right model for you. Stove or electric, loud whistle or no whistle.
  2. Read a reliable pressure cooker cookbook that will help you get over some of your safety fears.
  3. Take notes on cooking times, so that you’ll know what to adjust next time.
  4. Take time to get a feel for how it works. Every stove is a little bit different, and every pot is a little bit different, too. There’s a bit of a learning curve. You will soon discover how wonderful it is for cooking things.

What not to do:

  1. Do not add too much liquid -Don’t cook foods that “foam” and don’t fill it more than half way.  Then, don’t worry about it.(the pressure cooker has a very low evaporation rate-about one tablespoon per 10 minutes of cooking vs one cup of evaporation in an uncovered pot). This can be easily fixed by decreasing the cooking liquid significantly. You can even go as low as your cooker’s minimum requirement (which is usually a cup) – check your manual to make sure.
  2. Do not over-cook. The pressure cooker infuses flavours up to a point, after that point the food is over-cooked and the meat becomes tough and tasteless because all of the juices have been squeezed into the cooking liquid – making a delicious stock (if there wasn’t too much water ; )
  3. Do not ignore the manual or do anything they say NOT to do.

Practice by just boiling water until you get the hang of it.  In general, once it starts releasing pressure on its own, just turn it down and “cruise” from there.

Safety features pressure cookers already have

  1. If the top is put wrong – it won’t reach pressure. If you do get it on and do not turn down the heat right away, the valve will release the extra pressure and will activate. If this value is accidentally blocked, a secondary valve (usually a little silicone or rubber stopper) will kick-in. Should THAT fail, the gasket (silicone or rubber circle that seals) will buckle and THAT will release pressure – I have never gotten to that stage but at that point it can get messy and may spray food on your cook top but not the ceiling.
  2. A self-locking handle keeps you from accidentally opening the pressure cooker while the contents are still under pressure.

I hope you consider pressure cooking – not just for the speed but for the flavour, the health benefits and the planet (it’s ridiculous how little energy it needs to operate). I’ll gladly help you navigate the process of getting acquainted with your pressure cooker – just make the decision to buy one!

Meals that can be made in minutes take the pressure off of home cooks who want to make good food but may be pressed for time.


How to use a Pressure Cooker?

After the required number of whistles, the stove should be turned off. Once the heat is off, all the steam releases naturally in 5-10 minutes. This is the best way of cooking as it retains all flavours and nutrients. However, steam can also be quick released by using the steam release valve or by gently lifting the whistle (depends on the model of cooker and instructions that came with it). Check out my video to see how steam can be released early before its usual time.

In general, perform these safety checks and you will be good to go:
1. Check to make sure there are no dents or cracks in your pressure cooker or the rubber gasket before using it.
2. There must always be some sort of liquid in your pressure cooker before you close the lid.
3. The pressure cooker should never be more than ⅔ full as there needs to be room for the steam to accumulate.
4. Never try to force open the lid of the pressure cooker when there is steam inside. You can get seriously burnt.
5. Even when it is safe to open the lid, lift the lid away from your face, as the contents will be steaming hot.
6. All pressure cookers have a quick release valve/system. Follow the instructions to make sure you are doing it correctly.