Quickest Shahi Paneer ever- with a vegan option- No Ghee- No Butter

This is the easiest and a quick recipe for a complicated sounding yet most popular Indian delicacy. People in love with aroma of spices appreciate this preparation the most. Read through handy tips at the end of the recipe to try out vegan and no fat options. 

SERVES: 4

Why this recipe? How is it green? How am I contributing to making this earth green by following four steps or less recipes?

Using Pressure Cooker will take 5-7 minutes whereas it will take 20-25 minutes in a regular pan. 

You save: 40% of fuel energy and 20 minutes of your precious time that may be about 20 to 30% of the total time you spend in kitchen on an average (assuming you spend a total of 1-2 hours in a day in the kitchen)
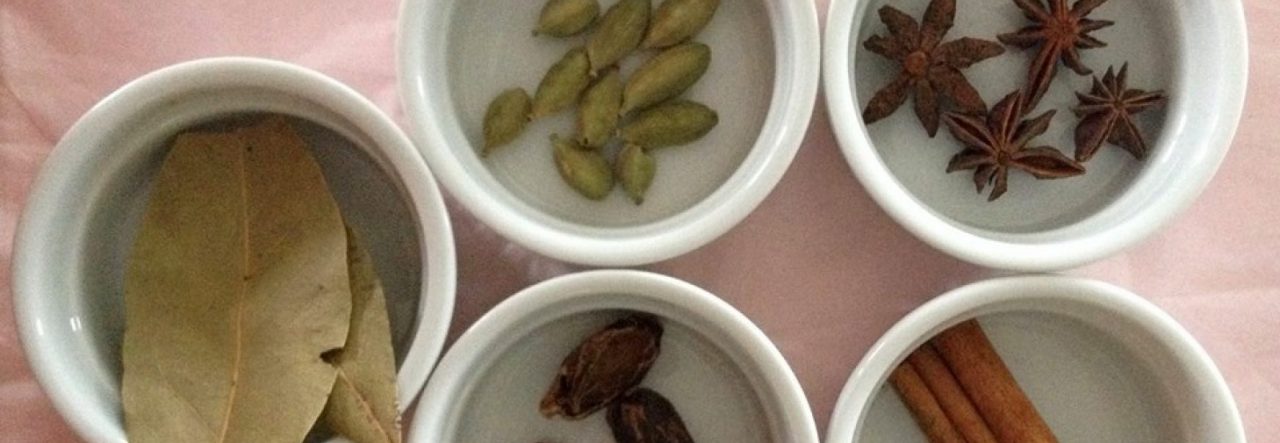
INGREDIENTS:

1 tablespoons oil
1 cinnamon stick (small)
1 star Anise
1 brown cardamom
5 pieces of cloves
1 teaspoon of tandoori masala
3 medium tomatoes cut very small (preferable pureed)
½ kilo paneer (cottage cheese, feel free to replace it with Tofu, I love it)
1 inch frozen garlic or 2 crushed cloves
2 inch frozen or 25 grams fresh grated ginger
1 teaspoon red chilly powder
1 teaspoon salt
½ teaspoon sugar
20 cashews or almonds (powdered)
200ml full cream milk (I usually make it with low fat milk)

STEP 1. Put all whole spices into heated oil, sauté until brown, should take about a minute or less.
STEP 2. Add small cut tomato/puree, red chilli and sugar and cover pot, let simmer for 3-4 minutes before you add powdered nuts with ¼ glass of water and put pressure cooker lid. Cook for 3-5 minutes in Pressure Cooker until pressure builds up. In an regular pot with lid it will take about 15-20 minutes.
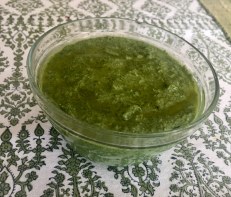
STEP 3. Remove whole spices and run the hand grinder for 1 to 2 minutes right into the pan to make gravy smooth.
STEP 4. Add paneer pieces and half cup of cream/milk to curry as it becomes thick. Let it boil for 5 minutes before you serve.

HANDY TIPS:
1. You can replace cashew nuts/almonds with peanuts or other nuts as per your taste.
2. You may want to garnish it with cut fresh coriander leaves and if you don’t care about making it lean (fat free), feel free to add a tablespoon of fresh cream or butter while serving. For vegan options replace milk with soy milk, coconut milk or almond milk and paneer with Tofu.

Deadly Nyama Choma..

This memory ruminated back early this week after I met some of my long lost friends from my time working at the IRC in Kenya, two decades ago. A quickly arranged reunion at our new home in Nairobi turned out to be such a pleasant afternoon catching up with everyone. It was great to see the same old faces with a new look — more mature, yet holding the same expressions, nuances and  innocence of twenty years ago. We talked and chuckled about all the time we spent together as colleagues. One memory from 1998 that we all fondly recalled and could not stop laughing about was when I had suggested hosting a small house warming party at our new home in Nairobi. This was going to be the first get together with just my finance colleagues. Reacting to my proposal, Gabriel instantly came up with the idea that we should have a nyama choma evening — a traditional Kenyan barbeque. It seemed like a good idea to me to do something that would introduce me to the local culture.

I was new to Nairobi so I asked them where to get the meat for nyama choma, Gabriel readily offered to arrange for it. I was relieved that I just had to make some Indian food to compliment the main dish. It was agreed that the meat would be sent to my home and I would marinate it to be roasted in the evening.

On the day of the party, I was busy cleaning and getting the house ready when I saw somebody coming in through the gate. They were accompanied by a hopping, healthy, breathing and very much alive 3-foot-tall goat!

Seeing the live and kicking mammal, it did not occur to me even once that this could be the meat that Gabriel had promised to arrange. I was in a shock. I could not visualize this live goat lying in tiny pieces in the evening on the small outdoor griller we had. I called him and shared my sentiments as best as I could without sounding too distressed or tousled. I asked how he could possibly help in the situation and what to expect next. To my respite he offered to arrange for the meat to be made available in the form that we are used to see it. Soon enough there was somebody who took the live goat behind the house and came back with a torso of the goat without the head. It was again a sight that I had not expected. So I asked for it to be cut into a size and form that could be roasted. It took a couple of hours and the sacrifice of two chopping knives to get the meat to be ready. I once again cringed when I saw the quantity of meat we had on hand, considering that we would have a maximum of ten people that night for the get together. I recall mentioning to Manoj that we needed at least 50 people to tackle this much meat. Nevertheless, we had a great evening and all of the meat was polished off.

We not only created some treasured memories, we got acquainted to the local custom of nyama choma in the best of company we could have had.

Baked Arrowroot Chips

SERVES: 2

GLUTEN FREE

Why this recipe? 

Quick to make, great to store, healthy option for munching time.

I cup of sliced Arrowroot (120 grams) is only 78 calories. With this baked chips option you will have a healthy snack loaded with folate and B12. It is low calorie and is easy to digest. These crisp chips taste as good as potato chips, even better. 


INGREDIENTS

1 small arrowroot bulb about 80-100 grams
1 tablespoon olive oil
1 teaspoon salt
1 teaspoon seasoning

PREPRATION

Preheat oven to 200 C degrees

STEPS
STEP 1. Slice arrowroot to make chips. Pat them with a clean cloth or paper napkin to remove moisture.
STEP 2. Put all ingredients together in a bowl and mix well
STEP 3. Spread evenly, the oil and salt smeared chips on a baking tray on parchment paper
STEP 4. Bake the chips for 8-10 minutes in top rack and then turn them around and bake for another 5-10 minutes.

Serve with one of the delicious and healthy Yogurt dips

HANDY TIPS:
1. You can make Zucchini, cassava or sweet potato baked chips the same way, adding a bit of minced garlic or ginger will give the chip a different and a nice flavour.
2. For more crispy gluten free options try adding some oats flour, rice flour, or consider adding an egg white when preparing the chips for baking.

Homemade gluten free Dhokla

SERVES: 4

GLUTEN FREE

Why this recipe? How is it green? How am I contributing to making this earth green by following four steps or less recipes?

Quick to make, great to store, steam in a pressure cooker, pan or in microwave. 

Dhokla is chickpea flour steamed savoury cake. It is one of the most healthy snacks to have at a time when you carve for something savoury but do not want to have some off the shelf thing that usually has pastry flour or shortening in abundance.IMG_2844

Dhokla is readily available in local India market and indian sweet shops in North America. However, it may not be completely gluten free as semolina is a common ingredient for Dhokla. This recipe however is gluten free. I have been making Dhokla using readymade mix for sometime but now, in my zeal to avoid all preservatives and emulsifiers, I have tried this recipe many times and now have got it perfect. The dhokla comes out really soft and spongy. I have been making it more in the microwave than the conventional steaming in a pan or cooker.

INGREDIENTS:

For Dhokla
1 cup chickpea flour
1/4 cup olive oil or cooking oil
1 teaspoon yogurt
½ cup water
1 teaspoon fruit salt or ( mix of 1 teaspoon baking powder and 1/4 teaspoon baking soda)
1/4 teaspoon turmeric powder
1 tablespoon lemon juice
½ teaspoon salt
2 inch frozen or 25 grams fresh grated ginger

For Dhokla Garnish
1 teaspoon oil
½ tablespoon mustard seeds
1 tablespoon sugar
2 hot green chillies cut in thin long slices
½ cup water

STEPS:
STEP 1
. Mix all ingredients except fruit salt (baking soda/baking powder) making sure there are no lumps.  The mixture should not be too runny, it should be something like that for crepes or pancakes. Add more water if needed.
STEP 2. Let it rest for 5 minutes while you prepare the steamer with enough water and grease the dhokla container with oil.
STEP 3. Mix fruit salt into the mixture, you will see it rising as you mix it, stir for a minute and pour it into steaming dish. Steam it for 4-5 minutes in microwave or 15-20 minutes on stove steamer or pressure cooker without whistle.
STEP 4. Remove from steamer and let it cool down for 10-15 minutes before removing from the container.

STEPS for Dhokla Garnish: 
STEP 1
. Put oil in a very small pan and add mustard seeds to it.
STEP 2. As they start to splutter (will be in few seconds) add green chillies, water and sugar slowly and carefully. Let it boil for 2 minutes.
STEP 3. Cut Dhokla into even sized square pieces.
STEP 4. Pour mixture evenly on prepared dhokla.

HANDY TIPS:
1. For microwave steaming, if you do not have a dhokla stand ( that has a water tray, a flat container and a cover), just use any container/tray to fill water, keep a small bowl upside down in the water tray to raise the level at which dhokla mix container will be put. Cover the tray and container with microwave lid so that steam remain between the tray and dhokla container.
2. Put some fresh coriander or parsley leaves to garnish before serving.

Pesto with a twist- Curry leaves pesto

SERVES: 2

GLUTEN FREE

Why this recipe? How is it green? How am I contributing to making this earth green by following four steps or less recipes?

It is green in colour so it is GREEN! Ha ha! jokes apart, this preparation is made with curry leaves full of a unique flavour and antioxidants. Curry leaves also have many medicinal benefits.

Quick to make, healthy choice, great to store, no cooking required. Pesto

INGREDIENTS:

3 tablespoons olive oil
1 bunch of curry leaves, approximately 10 strands of leaf stems
1 handful of pine nuts or pecans or walnuts
1 medium size lemon juice
½ teaspoon salt
4 cloves of garlic grated or 2 square inch of frozen garlic
25 grams grated ginger or 2 square inch of frozen grated ginger
2 hot green chillies

STEPS:

STEP 1. Put all the ingredients in blender and puree it.
STEP 2. Voila! Pesto with a twist is ready. Use it as a dip or spread on sandwich or pizza base or over pasta.

HANDY TIPS:
1. Add more or less oil or lemon juice as per your liking.
2. Store this pesto in refrigerator in an airtight container for days.
3. Be creative – add some mint or basil leaves for another twist.

Overnight healthy yogurt oats


SERVES: 1

Why this recipe? 

GLUTEN FREE

This is quick to make, needs no special ingredient, is healthy and requires no cooking or heating. You can store it in refrigerator and have it for breakfast, snack or dessert. You can make it in bulk and store to save time for the next time you have a craving for something sweet yet healthy.

PREPARATION TIME6F28846A-A37F-42B7-BAE2-8D0388ADC26D
5-10 minutes
Refrigeration time : 3-4 hours

INGREDIENTS
2 tablespoon oats
1 tablespoon low fat yogurt
1 ripe peach or 2 strawberries
half handful of pecans/walnut/sliced almonds
1 teaspoon maple syrup or honey
1 passion fruit (pulp)-optional

3A12B43F-8228-4AF2-998E-82382B81E748STEPS
STEP 1. Blend fruits, yogurt and maple syrup/honey in blender.
STEP 2. Pour this mixture and nuts on top of oats in the container and mix well.
STEP 3. Leave it for a minimum 3-4 hours or overnight in the refrigerator.
STEP 4. Add passion fruit pulp on top before eating/serving.

HANDY TIPS:
1. Add milk to make the mix more liquid or to replace yogurt with milk as per your liking.
2. You can make this with any fruit like banana, berries, mango or apple.
3. Be creative, add cocoa powder, other nuts to your liking, replace maple syrup with jam or sugar or garnish with a layer of nutella instead of or under passion fruit pulp. (passion fruit gives it a crunchy feel)


How do I manage excess cooked food? Freeze or not?

Freezing food is a good way to have meals on the go! Whether it be leftovers or extra big batches made for future consumption, it is important to know how to store different foods. Here are some steps to make sure that frozen/refrigerated food is safe to eat and the taste is well preserved for your next meal:

      1. Freeze any fresh cooked food only once it cools down and reaches room temperature. You can quicken the cooling process by placing food in a shallow container on a cooling rack to allow air to circulate all around the container. Limiting the depth of food in containers to 2 inches or less leads to quick cooling.
      2. You can refrigerate practically any recipe of fresh cooked food if you are not going to use it for the next 2-3 days. If you plan to use the cooked food within this time, it is perfectly safe to keep it in fridge, it does not need to take up freezer space!
      3. thumb_IMG_0290_1024Store/freeze excess cooked food in small differently sized containers or freezer bags (not storage bags) so that you only reheat/thaw the amount needed for that meal. thumb_IMG_0105_1024

If using freezer bags try to flattened the food into a thin layer. A lumpy or rounded shape takes longer to thaw through to the middle.
Flat packages are also better for stacking in your freezer.

4. If you had to freeze a large container but want to eat a part of it at a time, be careful when refreezing partly thawed food. The thawed food can be safely refrozen if it still contains ice crystals. Try to reduce the time between thawing and refreezing to ensure that the food to be refrozen does not thaw completely.

Also check- How best to thaw frozen food? and Facts to know with freezing and thawing cooked food.

Tested home remedy to fade scars

ubtanSome scars that result from measles or severe acne can be with you for life. I recall an easy home remedy that I tried and found very useful in my University days after I had an encounter with measles. For this scrub that takes away the scars and marks all you need is:

  1. 1/4 cup of rice, soaked overnight in water
  2. 1 teaspoon of turmeric powder (optional)
  3. milk-30 ml.


Here are the steps to follow:

  1. Coarsely grind rice in a grinder
  2. Add turmeric powder and milk
  3. Scrub affected area gently in circular motion for 3-4 minutes.
  4. You may want to spread the mix on all of your face and neck and leave it on for 5-10 minutes to get your skin glowing in addition to fading the scars you are working on.

Adding turmeric powder will bring glow to your skin. Turmeric is an antiseptic and is highly recommended all skin types to cure skin problems like acne, burn marks, psoriasis and much more. Its anti-inflammatory powers are used to reduce the signs of ageing, exfoliate dead skin, clear the skin and ease eczema.

Invigorating Lamb-नशीली गोश्त करी

SERVES: 4

Why this recipe? How is it green? How am I contributing to making this earth green by following four steps or less recipes?

Using Pressure Cooker for this recipe will take 10-15 minutes for the meat to cook whereas it will take 30-45 minutes in a regular pan. 

This recipe saves you : more than 70% of fuel energy and 30 minutes of your precious time that is about 16 to 20% of the total time you spend in kitchen on an average (assuming you spend a total of 2-3 hours in a day in the kitchen)

Allows you to explore your creative side. For vegetarian options, substitute lamb with baby potatoes, baby pumpkins, cottage cheese or other veggies.

TOTAL COOKING TIME: 25-30 Minutes

INGREDIENTS:

1 tablespoon oil
1 daal chini (cinnamon stick)
1 chakraphool (star anise)
1 brown elaichi (cardamom)
2 green elaichi (cardamom)
50 grams of khus khus (poppy seeds)
2 tez patta (bay leaf)
6 palm sized pureed or finely chopped onion
2 medium sized pureed tomatoes
1 inch frozen ginger
2 inch frozen garlic
2 teaspoons meat masala/ curry powder
1 kilo lamb shoulder cut to small pieces
1 teaspoon red chilli (if you like it hot)
1 inch frozen green chilli or 2 fresh green chilies
1 teaspoon garam masala (All spice)
2 teaspoons salt

STEP 1. Put daal chini (cinnamon), chakraphool (star anise), elaichi (cardamoms) and tez patta (bay leaf) in heated oil, after 30 seconds to a minute add pre sautéed onion and poppy seeds or if using freshly chopped onion, sauté until onion are light brown.
STEP 2. Add lamb and meat masala , Stir for 2-3 minutes, add frozen ginger, frozen garlic, green chilli, salt and red chilli powder .
STEP 3. Sauté for 5-7 minutes and then add pureed tomato, and stir it well, add half a glass of water before you close the lid of the pressure cooker.
STEP 4. Cook on low heat for 10-12 minutes (or for three whistles) in pressure cooker or for 30-45 minutes in pan with lid on and add garam masala before serving.

HANDY TIPS:lambcurry

  1. You can replace lamb with pork, chicken, beef and baby potatoes or vegetables for vegetarian option.
  2.  Always wait for the steam in pressure cooker to release by itself. This is a safety precaution as well as retains all flavour of the food.
  3. Add a few drops of Kewra essence (a floral essence) to get that unique rich muglai flavour.

Guilt Free, Gluten free, no carb Pizza


GLUTEN FREE, NO CARBS 

QUICK TO MAKE

Why this recipe? 

A similar conventional recipe for a home made flour based pizza base would take considerable time for yeast to work its way. Nutritional benefits of cauliflower and goodness of eggs adds to the dietary value of the pizza base. 

Vegan Option (no eggs, no dairy, no sugar)

For the vegan option replace eggs with chia/flax seeds and almond meal mixed with water. (see recipe below) 

How is it green? How am I contributing to making this earth green by following four steps or less recipes?

This recipe requires minimum cooking time, you save fuel energy and your precious time. You can also make 2-3 pizza bases with the same oven baking time and save them for future use.

SERVES- 2-3
COOKING TIME
15 minutes for no flour pizza base
20-30 minutes for vegan pizza base
8-10 minutes for pizza toppings

Flour free Pizza (with eggs)

INGREDIENTS:
1 medium sized cauliflower (400 grams)
2 eggs
1 teaspoon salt (optional)
1/2 teaspoon Red chilli flakes (optional)
1 table spoon dill weed or oregano(optional)
Pizza toppings and cheese to taste

guilt free pizzaSTEPS:
1. Chop/grind cauliflower and squeeze all water out of it.
2. Beat eggs and add all ingredients to it (squeezed cauliflower, salt, chilli flakes and oregano).
3. Spread/pat down the mixture on parchment paper and bake for 10 minutes at 400F or until the base turns lightly brown. It usually take 10 minutes.
4. Add toppings and cheese to the pizza to your taste and bake for another 5-10 minutes.

For Vegan Option:

INGREDIENTS:
1 medium sized cauliflower (400 grams)
3 tablespoons of ground chia or flax seeds
1/2 cup of almond meal
3 to 6 tablespoons of water
1 teaspoon salt (optional)
1/2 teaspoon Red chilli flakes (optional)
1 table spoon dill weed or oregano (optional)
1 teaspoon olive oil
Pizza toppings to taste

Preparation For Vegan pizza base:

Mix ground chia or flax seeds with 3 tablespoons of water and leave for 10 minutes for the mixture to look like thick vegan egg

STEPS:
1. Chop/grind cauliflower and squeeze all water out of it.
2. Add all other ingredients squeezed cauliflower that is chia mix, almond meal, salt, chilli flakes and oregano). You may need to add more water for the mixture to be able to spread like dough, but add as little to make the crust crispy.
3. Spread by patting the mixture on parchment paper and bake for 20 minutes at 400F or until the base is lightly brown.
4. Add toppings to the pizza to your taste and bake for another 5-10 minutes.

Serve with one of the delicious and healthy Yogurt dips

HANDY TIPS:
1. Spread or spray some olive oil on the pizza just before putting it in the oven. This will make it more crisp and yummy.
2. You can make more than one pizza base as per your choice of thickness of the base and save them when they cool down. Wrap the base in a cling wrap and freeze for future use.